 Scuba diving gives you a feeling of weightlessness or floating without the danger of jumping out of an airplane at 10,000ft. If you haven’t tried scuba diving, you should; as there are 3 hour ‘discover’ courses in almost every city and most beach resorts offer scuba certifications onsite. Even though 70% of earth is covered by water, our oceans are our last undiscovered frontier. The vast amount of marine and plant life that exists just below the surface is simply amazing. From the thousands of exotic sea creatures, plant life that visually span the entire color spectrum and sunken treasures (battle ships, underwater caves) to spooky night dives – there’s always something to see while scuba diving.
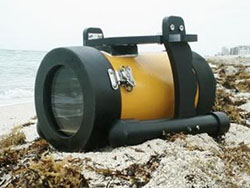
Since most video cameras are not waterproof, most divers do not have a way to share their experiences with anyone who is not also a scuba diver. In order to take video while diving – your video camera needed to be completely enclosed and protected from the water’s pressure. These enclosures are called ‘Underwater Camera Housings”. In the past, divers had to spend thousands of dollars to get an underwater housing – professional rigs can cost as much as $50,000. Though the prices have come down a little; most are still in the $500 to $1,500 range. This travel gadget review is focused on my experiences with the budget friendly Nemo 200 underwater housing.
Design
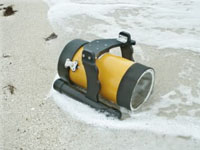 Underwater camera housings come in two flavors – those that can control the camera while underwater (mechanically or electronically) and those that can’t. As you might expect, the housings that provide the ability to control the camera are the more expensive ones. The Nemo 200 is a generic housing (not tied to a specific make/model) that does not allow the user to control the camera while underwater. As such, it is a fairly inexpensive option for recording underwater video.
Product Summary
The Good
- Inexpensive option – works as advertised
- Can be expanded to accommodate lights and internal video monitors
- Good to 120ft
- Most any recent camcorder will fit
- Excellent post sale service
The Bad
- Not neutrally buoyant, have to get it “Scuba Ready”
- Heavy and huge
- Black Latex paint on the ballast tubes rubs off and fades
- Inside platter clips secured with glue – which may break off
- No way to control camera functions underwater
Made By
Robb Moffett
Cost
$250-$300 via eBay
Warranty
6 months
Website
Nemo 200 Webpage
Grade:


The first thing you notice as you open the box is the overall size of the Nemo 200. This unit would not be associated with any use of the word ‘petite’. That aside, the unit is well packed and comes with everything you’ll need to operate the unit – including an instructional manual. The unit itself is made of PVC and stainless steel and coated with a very tasteful yellow and black color scheme. Once you take out all of the parts, there is a mounting board with two holes pre-drilled designed to be used with your camcorder’s tripod mount (a screw is included in the box). Once attached to the board, you can slide the camera into the housing using the guidance clips, place the o-ring and acrylic lens in place and seal the housing using the 3 latches on the unit. Though the unit makes an excellent water seal out of the box, it is not “Scuba Ready”.
The primary act of scuba diving (aside from breathing) is the management of buoyancy, e.g., controlling your ascent or descent underwater. If an object sinks like a rock when placed into water – it’s called negatively buoyant; if it rises to the top – it’s positively buoyant. If it does neither, i.e., it sorta floats in suspended animation – it’s neutrally buoyant. Because the Nemo 200 is positively buoyant out of the box, it cannot be used in a scuba environment until extra weights are added to make it at least negatively buoyant – preferably neutrally buoyant. It would be too difficult for a diver to properly descend in the water – let alone film something – with such a large object pulling them back to the surface. This means you will have to find some way to add non-corrosive and environmentally safe weight to the Nemo 200 before you take it out on a dive.
Also, because the front of the housing is essentially a large round plate of acrylic, you’ll have to go to a video store and purchase a sheet of color gels if you want to use a Blue or Green water filter. An alternative to this is some camcorders (like Sony) have a screw ring around the lens that you can attach a true Blue/Green water filter.
Features
As I said earlier, you’ll have to add weights to the Nemo 200 to make it neutrally buoyant. This can be done by strapping a weight to the underside or adding lead balls to the ballast tubes. In addition, you can also add lights onto the exterior of the camera by attaching standard strobe lighting connectors. Many of the expensive camera housings have the benefit of electronic or mechanical controls – but they are generally tied to a specific model of camera. Buy a Sony today and upgrade to a Panasonic two years from now – you’ll have to shell out another $1,000 for a Panasonic specific housing. Being a generic camera housing, the Nemo 200 will continue to be of use no matter what brand of camcorder you choose in the future. Here’s a quick rundown of the Nemo 200 features:
|
|
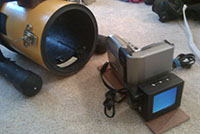
One of the benefits of having such a large housing is that it aids in taking steady video while underwater. If you’ve ever watched someone’s home video and have become nauseous from all of the shaking, you’ll appreciate this benefit. To further aid in taking excellent video, I added a self powered video monitor directly behind my camcorder on the mounting board. Using the large back window on the Nemo 200, I can easily frame a shot while diving without worrying whether it was captured out of frame.
The Nemo 200 is manufactured by a small business owner out of the Miami area (we love supporting small business owners – don’t we???) who sells his products via eBay. Don’t let the fact that this isn’t a major corporation give you the impression that there isn’t top-notch effort put into the product. The very secure packaging, extra o-rings, ring grease, printed manual and a direct number/email address all speak to someone who stands beside their product.
Performance
I have to admit, finding the right size and amount of lead I needed to properly make the Nemo 200 neutrally buoyant was a pain. Sure I could find 10lbs of weight – the problem is securing said weight to a circular object that is frequently submerged in salt water. I finally settled on a combination of lead beads in the ballast tubes and two 3lb weights velcroed to the sides of the canister. Cheesy – I know. In the end, it took about 10lbs to make the Nemo 200 neutrally buoyant in salt-water (about 7lbs in fresh water).
I’ve taken the Nemo 200 into fresh and salt water – and once properly weighed – the results have been excellent. I have not had any issues whatsoever with leaks. The housing worked as advertised on all of my dives up to 60ft. The below video shows two of my experiences with this video housing – the first part is the Great Barrier reef in Australia and the second is a Cenote in Cancun, Mexico.
There were a few things that became evident about the inability to control the camera while underwater. Since there’s no way to control the record stop/start, zoom or any other function of the camera while underwater – you have to start the camcorder recording ‘before’ you get in the water. This creates a good deal of ‘dead’ video – which is several minutes of useless video like walking into the water or waiting on the surface for the group to go down. On my trip to Cancun, almost 20 minutes of dead footage was recorded before the actual dive.
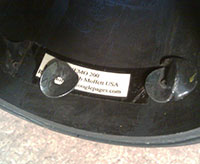 Although it’s not likely to happen to everyone who uses the Nemo 200, two of the clips that hold the mounting board in place broke off. Somewhat disappointing that these clips were glued/epoxied to the inside of the canister – though using screws could be dangerous. Also, even when the Nemo 200 is neutrally buoyant, it is so large that it generally requires two hands to operate. Though one-handed operation is possible – it becomes unwieldy – especially in waters with a current. Finally, the microphone for your video camera can pick up sounds through the Nemo 200; however, it’s unlikely to be anything but the gurgling from your regulator.
In Conclusion
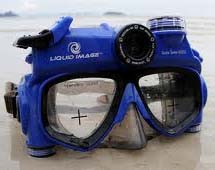
In the end, the Nemo 200 works as advertised. As long as you understand its limitations, it can be a useful and fun product. My suggestion is get it if you want to save money, not be tied to a specific camera model and don’t mind the travel weight and size (like if you drive or live near your dive spots). If on the other hand you can’t stand paying the airlines another nickel to carry your bags, find something this large a little unwieldy or require some level of camcorder control while underwater – this is not the housing for you. Your other options are to shell out the extra cash for a more advanced housing, use various digital still camera options or look into video cameras embedded into the scuba mask itself.
Note: The manufacturer also offers two smaller versions of an underwater housing – though you lose a good deal of flexibility with respect to external lights, internal monitors and camera size.
Until next time – Happy Travels!!!




.jpg)


